
Welcome to a comprehensive guide on how to print screen in Windows 11 using various methods! If you’re looking to create tutorials, capture funny moments, or share information with friends and colleagues, mastering the art of screen snipping is essential. In this article, we’ll delve into six fantastic methods that Windows 11 offers for capturing your screen, whether it’s the entire display, a specific window, or a custom region. So, let’s dive right in and explore the world of screen snipping!
Understanding Screen Snipping
Before we delve into the nitty-gritty of snipping methods, let’s explore the concept of screen snipping. Screen snipping refers to capturing selected parts of your screen as images. This is an invaluable tool for a variety of tasks, whether you’re trying to save an error message, create a tutorial, or share a memorable online moment. Unlike the traditional method of taking a full-screen screenshot, screen snipping allows you to focus on specific areas, enhancing your communication and collaboration capabilities.
Method 1: The Classic Snip Tool

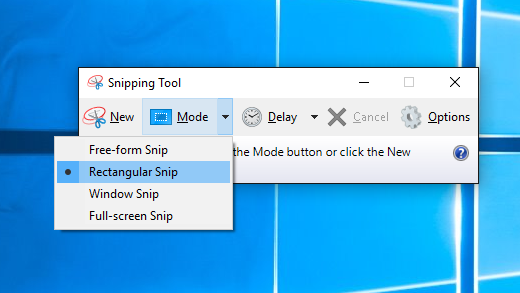
The classic Snip & Sketch tool in Windows 11 offers a simple yet effective way to capture your screen. To access this tool, press Windows Key + Shift + S. You’ll notice a snipping toolbar at the top of your screen. Choose from options like Rectangular Snip, Freeform Snip, Window Snip, or Fullscreen Snip. Once you’ve made your selection, simply drag and select the area you want to capture. The snipped image will then open in the Snip & Sketch editor, allowing you to annotate, crop, and save your snip.
Tip: Use the Delay option for capturing pop-up menus and tooltips. Windows 11 will wait a few seconds before capturing the snip, giving you ample time to set up the screen exactly as you want.
Advantages of Snip & Sketch
- Annotate on the Fly: Snip & Sketch lets you annotate your screenshots immediately after capturing them. This feature is a game-changer for professionals who need to add explanations, highlight key points, or draw attention to specific elements in their visuals.
- Multiple Snip Shapes: Unlike traditional rectangular snipping, Snip & Sketch provides options for free-form, rectangular, and even full-screen snips. This flexibility ensures that you can capture exactly what you need, without unnecessary cropping later.
- Pen and Touch Support: If you’re using a touchscreen device or a stylus, Snip & Sketch is your creative canvas. Draw, sketch, or write directly on your screen to personalize your snips with a touch of artistic flair.
- Easy Sharing and Saving: Once you’re satisfied with your annotated snip, sharing is a breeze. You can instantly copy it to your clipboard or save it as an image file. This efficiency streamlines your workflow, saving you time for more important tasks.
- Integrated with Windows 11: Snip & Sketch is seamlessly integrated into the Windows 11 interface, making it readily accessible. The Win + Shift + S shortcut ensures that you can capture and edit your snips without disrupting your workflow.
Flaws of Snip & Sketch
- Lack of Advanced Editing: While Snip & Sketch offers basic annotation features, it lacks the advanced editing capabilities of dedicated image editing software. If you need to perform intricate editing tasks, you might need to transfer your snip to a more powerful tool.
- Limited File Formats: Snip & Sketch primarily saves snips in the PNG format. While PNG is high-quality and widely supported, the absence of other formats might be limiting if you have specific file format requirements.
- Learning Curve for New Users: While Snip & Sketch is user-friendly, some new users might initially find the interface slightly overwhelming due to the variety of annotation tools and options available.
- Incompatibility with Older Windows Versions: Snip & Sketch is exclusive to Windows 10 and Windows 11. If you’re using an older version of Windows, you won’t be able to enjoy the benefits of this tool.
Method 2: The New Snipping Tool
With Windows 11, Microsoft introduced an updated Snipping Tool, providing an alternative to the Snip & Sketch tool. The new Snipping Tool offers a modern interface and improved functionality. To access it, press Windows Key + Shift + S and choose the Snipping Tool option. This tool allows you to take screenshots of your entire screen, specific windows, or a custom area. The snipped image will then pop up, ready for editing and sharing.
Did You Know? The new Snipping Tool includes a Spotlight feature that lets you magnify specific parts of your snip, making it ideal for showcasing intricate details.
Advantages of Windows 11 Snipping Tool
- Ease of Use: The Snipping Tool’s user interface is simple and intuitive, making it accessible to users of all skill levels. It’s a go-to choice for those who prefer a straightforward and no-nonsense approach to screen capturing.
- Variety of Snip Types: The Snipping Tool offers four snip types: Free-form, Rectangular, Window, and Full-screen. This variety allows you to capture exactly what you need, whether it’s a specific region, a particular window, or your entire screen.
- Basic Editing Features: While not as robust as dedicated image editing software, the Snipping Tool provides basic editing tools such as highlighting, underlining, and adding annotations. These features are useful for adding context to your screenshots.
- Compatible with Older Windows Versions: Unlike some newer methods, the Snipping Tool is available on older versions of Windows, ensuring compatibility for users who haven’t upgraded to Windows 11.
Flaws of Windows 11 Snipping Tool
- Limited Annotation Options: While the Snipping Tool offers basic annotation tools, it lacks the advanced editing and annotation features found in more modern snipping methods like Snip & Sketch.
- No Built-in Sharing: Unlike Snip & Sketch, the Snipping Tool doesn’t provide seamless sharing options. After capturing a screenshot, you’ll need to save the image and then share it through other means, adding an extra step to your workflow.
- Lack of Updates: As of Windows 11’s release, the Snipping Tool hasn’t seen substantial updates for a while. This could mean missing out on potential improvements and enhancements available in newer snipping methods.
- Cumbersome Workflow for Quick Edits: If you need to make quick edits or annotations to a screenshot, the Snipping Tool’s interface can feel a bit clunky, potentially slowing down your workflow.
Method 3: Snip & Sketch Improvements
Windows 11 has brought enhancements to the Snip & Sketch tool, making it more versatile. Now, after snipping, you’ll receive a notification that opens the snip directly in the Snip & Sketch editor. This streamlines the process, eliminating the need to locate your snipped image manually. Additionally, the editor provides a range of tools for highlighting, drawing, and cropping, allowing you to customize your snips with ease.
Method 4: The Print Screen Key
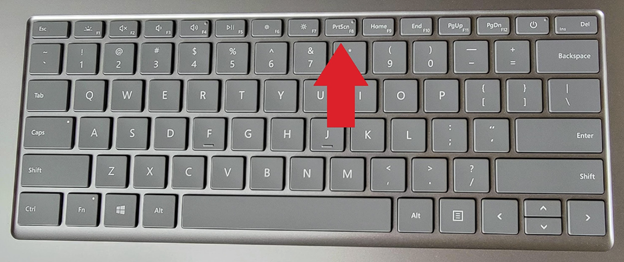
The Print Screen key remains a quick and convenient method for capturing your entire screen or a single window. Pressing the Print Screen key will capture the entire screen, while Alt + Print Screen captures only the active window. The snip is then copied to your clipboard, and you can paste it into an image editor or document. This method is great for capturing moments that happen unexpectedly and quickly.
Pro Tip: To capture only a specific region of the screen using the Print Screen key, capture the whole screen and then crop the image using an image editor.
Method 5: Windows + Shift + S Shortcut
Windows 11 introduces a nifty shortcut that provides direct access to the Snip & Sketch tool. Press Windows Key + Shift + S, and the snipping toolbar will appear at the top of the screen. This shortcut is perfect for when you need to quickly capture and share a specific section of your screen without navigating through menus.
Have you ever wanted to capture a hilarious conversation snippet in a messaging app? The Windows + Shift + S shortcut makes it a breeze!
Method 6: Snipping Tool in the Context Menu
For a more context-sensitive snipping experience, Windows 11 allows you to use the Snipping Tool directly from the context menu. Simply right-click on the Start button, and you’ll find the Snipping Tool option. This convenient method lets you jump straight into snipping without having to remember keyboard shortcuts.
The Snipping Tool in the context menu is a testament to Microsoft’s dedication to user accessibility and ease of use.
Method 7: For the Gamers – Game Bar Screenshots
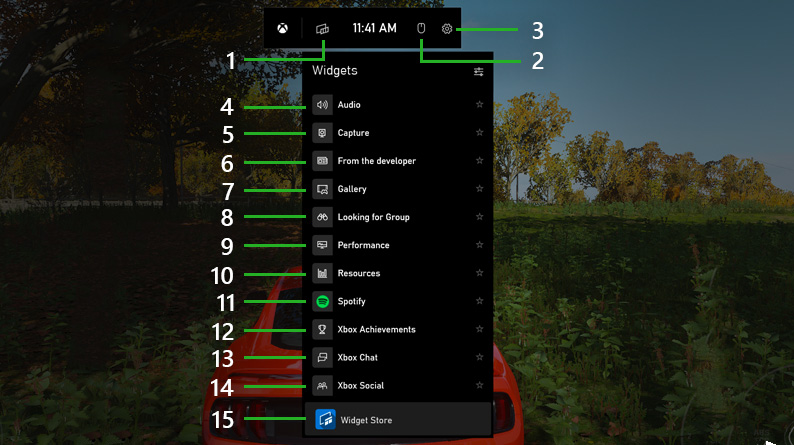
Calling all gamers! Windows 11 hasn’t forgotten you in its pursuit of enhancing user experience. The Game Bar comes equipped with a screenshot feature that’s tailor-made for your gaming triumphs. A quick press of Win + G summons the Game Bar, allowing you to immortalize your epic wins, amusing glitches, or mesmerizing landscapes with a screenshot.
Choosing the Right Method for You
With these six methods at your disposal, you might wonder which one is the best fit for your needs. The answer depends on your preferences and tasks. Are you a designer looking to add annotations? Snip & Sketch might be your go-to. Are you a casual user who occasionally needs to capture screens? The classic Print Screen overlay might be just right. By understanding your requirements, you can effortlessly choose the most suitable method to enhance your screen snipping experience.
Tips for Enhanced Screen Snipping
Before we wrap up, let’s drop some expert tips to supercharge your screen snipping prowess:
- Customize Your Shortcuts: Windows 11 allows you to customize your snipping shortcuts, so take advantage of this feature to create a workflow that suits you perfectly.
- Utilize the Clipboard: Snipped images are automatically copied to your clipboard, ready for pasting into documents, emails, or image editors.
- Explore Snip Delay: Some snipping methods offer a delay feature, which can be handy when capturing specific elements that appear after a short period.
Screen Snipping like a Windows 11 Pro
Congratulations, you’re now equipped with the knowledge to master screen snipping in Windows 11! Whether you’re a professional aiming to enhance your work communication or a creative individual wanting to share your visual inspirations, these methods will empower you to capture and convey your ideas with finesse. Embrace the flexibility, efficiency, and creative potential that screen snipping offers.
Conclusion: Unleash Your Snipping Potential
In the ever-evolving world of Windows operating systems, capturing and snipping different parts of your screen has become an indispensable skill. With Windows 11, Microsoft offers a variety of methods to suit your snipping needs, from the classic Snip & Sketch to the revamped Snipping Tool and intuitive shortcuts. Whether you’re a professional creating tutorials or simply someone who loves sharing moments, mastering these snipping methods will empower you to convey your ideas effectively and creatively.
So, there you have it—the ultimate guide to snipping in Windows 11. Armed with these six methods, you’re ready to embark on a snipping journey filled with fun, efficiency, and the ability to capture life’s digital moments in style. Happy snipping!

Steven Adams, a former bank assistant, is now the founder of a tech news website. With a passion for staying up-to-date with modern advancements, Steven delivers insightful and accessible content to keep readers informed about the evolving world of technology.
Join him on his journey to uncover the latest tech news and explore groundbreaking innovations.